Dual Curved Monitor Setup: Optimize Productivity and Gaming
Have you ever sat at your desk and felt like something was just… off? Maybe your eyes hurt after a few hours, or you kept turning your head too much between screens. If that sounds familiar, you’re not alone. Millions of people are switching to a dual curved monitor setup, and once you try it, flat screens start to feel oddly primitive.
Whether you’re grinding ranked matches at 2 AM or juggling spreadsheets, browser tabs, and video calls all at once, your monitor setup matters more than most people realize. Let’s break down everything you need to know, from what these monitors actually are to how to set them all up properly.
What is a Dual Curved Monitor?
A curved monitor is exactly what it sounds like. Instead of a flat panel, the screen bends slightly toward you on both sides. This design mimics the natural curvature of your eyes, which means less distortion at the edges and a more comfortable viewing experience overall.
Now take two of those screens and place them side by side. That’s your dual curved monitor setup. The curve on each display wraps inward, creating a near-seamless panoramic view that almost feels like a cockpit around your workspace. It’s immersive in a way that flat screens simply can’t replicate.
The curvature of a monitor is measured using a rating like 1500R or 1800R. The R stands for radius, and the number tells you how wide the curve is in millimeters. A 1500R monitor has a tighter curve, pulling you into the display more aggressively. An 1800R is gentler and often preferred for general work. Neither is universally better, it really depends on how you use your screens and how far you sit from them.
Most curved monitors on the market today range from 24 to 34 inches, with ultrawide curved models sitting on the larger end. For a dual setup, 27-inch monitors tend to hit the sweet spot between screen real estate and desk space.
Read More: Tech News PBoxComputers: Learn About the Latest Updates
Benefits of a Dual Curved Monitor Setup

Let’s be honest. A dual curved monitor setup looks incredible on a desk. But the benefits go well beyond aesthetics.
First, there’s the eye strain factor. Flat monitors force your eyes to work harder to focus across a wide surface, especially toward the edges. Curved screens follow your natural line of sight more closely, reducing the constant micro-adjustments your eyes make. After a long session, that difference adds up.
Then there’s immersion. If you’re a gamer, you already know that field of view is everything. A curved dual screen configuration wraps your peripheral vision into the action, making racing games, flight simulators, and open-world titles feel genuinely cinematic. You’re not just watching the game, you’re inside it.
For productivity, the advantages are just as real. You can have your code editor open on one screen and documentation on the other. Designers can keep their canvas on one display and their tools on the adjacent one. Writers and researchers benefit from keeping references on one side while drafting on the other. The dual screen productivity setup removes the constant alt-tabbing that quietly kills your focus throughout the day.
Ergonomics also improve significantly. With the right positioning, your neck stays in a more neutral position because the curve brings content toward you rather than forcing you to lean in. Combined with a monitor arm, you can fine-tune height, tilt, and distance to suit your posture perfectly.
And let’s not forget multitasking. Two screens mean two separate workflows running simultaneously. There’s no juggling, no context-switching chaos. Just clean, organized parallel productivity.
Selecting the Right Curved Monitors
Not all curved monitors are created equal, and choosing the wrong ones for your setup can be frustrating. Here’s what actually matters.
Start with curvature consistency. If you’re buying two monitors for a dual setup, get the same model or at minimum the same curvature rating. Mixing a 1500R with an 1800R creates a visual inconsistency that’s subtle but genuinely annoying over time. Colors, contrast, and the way content appears at the edges won’t match, and your brain will notice even if you don’t consciously register it.
Resolution is another big consideration. For 27-inch monitors, 1440p (QHD) hits the ideal balance between sharpness and performance demands on your GPU. If you’re gaming, you want enough headroom to push frames without your graphics card crying. For creative work like photo editing or video production, the added pixel density of 1440p over 1080p is genuinely noticeable.
Refresh rate matters too, especially for gaming. A high refresh rate monitor at 144Hz or 165Hz delivers smoother motion that makes competitive gaming feel more responsive. For productivity-only setups, 75Hz is perfectly adequate and saves you money.
Panel type shapes your experience as well. IPS panels offer better color accuracy and wider viewing angles, which suits content creators and anyone doing color-critical work. VA panels tend to have deeper blacks and stronger contrast, making them popular for gaming and media consumption. TN panels are the fastest but look noticeably worse, so they’re rarely the right call for a dual setup.
Also check for VESA compatibility before you buy. If you plan on using a monitor arm, and you really should, the monitor needs mounting holes on the back. Most quality monitors include this, but budget options sometimes skip it.
How to Set Up Dual Curved Monitors
Setting up a dual curved monitor configuration isn’t complicated, but doing it well requires attention to a few key details. Follow these steps and you’ll avoid the most common pitfalls.
Step 1. Choose the Right Monitors
Before anything else, finalize your monitor choice. As mentioned above, matching models is the smartest move. Identical monitors eliminate color calibration headaches and ensure your curved screen display looks consistent across both panels. If you’re upgrading from a single monitor, consider whether you want to match your existing display or replace both at once for a cleaner result.
Also think about size and desk space. Two 32-inch monitors sound great until you realize your desk is only 55 inches wide. Measure first. For most standard desks, two 27-inch monitors sit comfortably without hanging over the edges or requiring you to sit too far back.
Step 2. Position Your Monitors
Positioning is where most people get it wrong. The goal is to create a smooth visual flow between the two screens. Place the monitors so the bezels nearly touch in the center. Slight gaps are fine, but large gaps break the continuity and defeat the purpose of having a dual setup.
Both screens should angle inward toward you. Think of it like folding a book slightly. The inner edges face you directly, while the outer edges curve away. This arrangement supports the immersive viewing experience that curved monitors are specifically designed to deliver.
For horizontal positioning, align the center of your vision with the gap between the two screens. If you primarily use one monitor more than the other, shift that screen slightly toward the center of your field of view and angle the secondary screen outward a bit more.
Step 3. Adjust Monitor Heights and Manage Cables
Height matters more than people think. The top of each screen should sit roughly at or just below eye level. This keeps your neck in a neutral position and reduces the upward strain that leads to headaches after long sessions.
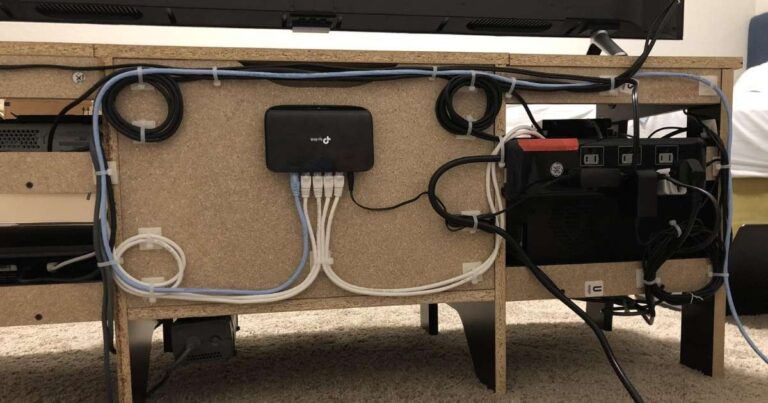
Cable management is one of those things that seems minor until your desk looks like a spaghetti factory exploded. Use cable clips, velcro ties, or a cable management tray mounted under the desk. Run display cables and power cords along the back of the monitor arm or desk leg. Clean cable routing not only looks better, it also makes troubleshooting and future upgrades far easier.
Step 4. Use a Monitor Arm
A dual monitor arm is genuinely one of the best investments you can make for this kind of setup. It frees up your desk surface, allows precise height and tilt adjustment, and gives you the flexibility to reposition your screens instantly.
Look for an arm that specifically states compatibility with curved monitors and check the weight capacity. Curved monitors tend to be heavier than flat ones due to their construction, so an arm rated for at least 15 to 20 pounds per head is a safe target. VESA compatible monitors attach directly to most arms using a standard 75x75mm or 100x100mm mounting pattern.
Gas-lift arms are generally smoother and more durable than spring-loaded models. Brands like Ergotron, Fully, and Flexispot have solid reputations in this space and won’t leave you frustrated with wobbly screens.
Step 5. Configure Display Settings
Once everything is physically set up, head into your display settings. On Windows, open Settings, then System, then Display. You’ll see both monitors represented as numbered blocks. Drag them into the correct left-right arrangement to match your physical setup. Set your primary display to whichever monitor you use most, usually the one sitting more centrally or directly in front of you.
Calibrate both monitors separately if possible. Even identical models can vary slightly in brightness and color temperature out of the box. Most monitors have built-in OSD menus that let you adjust these settings. For creative work, a hardware calibrator is worth the investment, but for gaming and general productivity, using your eyes and comparing the two screens side by side works well enough.
Enable any adaptive sync technology your monitors support, whether that’s FreeSync or G-Sync. This eliminates screen tearing, particularly during fast-paced gaming, and makes the overall experience smoother.
Additional Tips for a Perfect Dual Curved Monitor Setup
A few extras can genuinely elevate your setup from functional to exceptional.
Lighting matters more than you’d expect. Backlight your monitors with a bias light strip placed along the back edge of your screens. This reduces the contrast between the bright display and the dark wall behind it, significantly lowering eye fatigue during long sessions. It also looks fantastic on camera if you stream or take video calls.
Consider your GPU’s output capacity. Running two monitors, especially at 1440p or higher refresh rates, demands real bandwidth from your graphics card. Make sure your GPU has enough display outputs and that you’re using the right cable types. DisplayPort handles high refresh rate and high resolution combinations far better than HDMI in most cases.
If you use your setup for gaming and work, think about configuring display profiles. Some monitors and GPU software allow you to save preset configurations so switching between a productivity layout and a full-screen gaming mode takes seconds rather than minutes of manual adjustment.
Room temperature and ambient light affect your viewing experience more than most people acknowledge. Direct sunlight on your screens causes glare that no monitor setting can fully compensate for. Position your setup so windows are to your side rather than directly in front or behind you.
Finally, give yourself a proper chair and desk height before optimizing your monitors. All the ergonomic monitor positioning in the world won’t help much if you’re hunched over in a poorly fitted chair. Your monitors should complement an already solid seating posture, not try to compensate for one that’s broken.
Conclusion
A well-executed dual curved monitor setup transforms your desk into something genuinely powerful. It’s not just about looking impressive on a desk tour video. It’s about working more comfortably, gaming more immersively, and spending hours at your screen without wrecking your eyes or your posture.
The steps are straightforward once you know them. Choose matching monitors with the right curvature and resolution for your use case. Position them with care, invest in a solid monitor arm, and take the time to configure your display settings properly. Those details separate a setup that merely works from one that actually enhances your daily experience.
You don’t need to build this all at once either. Start with two solid monitors and a basic stand. Add the arm later. Refine your cable management when you’re ready. Build the setup that fits your space, your budget, and your workflow, and let it grow with you over time.
FAQ’s
What is the best curvature for a dual curved monitor setup?
The 1800R curvature works well for most users, offering a natural curve without feeling too aggressive, while 1500R suits those who prefer deeper immersion during gaming.
Do I need a special graphics card for dual curved monitors?
Not necessarily, but your GPU must have two available display outputs. A mid-range card with DisplayPort outputs handles 1440p dual monitors comfortably for both gaming and productivity work.
Is a monitor arm required for a dual curved monitor setup?
It isn’t strictly required, but a dual monitor arm gives you far more flexibility in positioning, frees up desk space, and makes ergonomic adjustments much easier to dial in.
How far should I sit from dual curved monitors?
For 27-inch monitors, a distance of roughly 24 to 30 inches from your eyes to the screen tends to be the most comfortable, reducing both eye strain and the need to move your head excessively.
Can I use two different brands of curved monitors together?
You can, but matching the curvature rating and getting as close to identical color profiles as possible will make the experience much more visually cohesive and easier to calibrate.

Evan Cole is a tech enthusiast and digital strategist with years of experience in content marketing and SaaS trends. He explores emerging technologies, AI innovations, and SEO-driven growth strategies. Evan’s insights help readers understand complex tech topics through practical examples and real-world applications that inspire smarter digital solutions.